The command line tool ffmpeg handles sequential images using a unique command, so no need to enter the names of each images or having to use a batch file.
For the ones who would like to test what follows but do not know how to install ffmpeg here is another post showing how to do it, for both Windows and OSX users: http://jeremyrichard.com/tip/install-the-ffmpeg-command-line-tool/.
Process
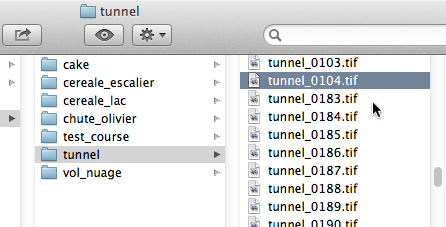
For the following explanation we will assume that we have a series of images called tunnel_0001.tif, tunnel_0002.tif, tunnel_0003.tif and so on, that are located inside a folder called ‘tunnel’. Also two things are to be remembered before we start:
- our files have to be sequentially numbered so ffmpeg knows the order of the files it has to work with (it is usually the case when the images have been captured with a stop motion animation software);
- the sequence needs to start by either 0 or 1 (if it is not the case go to the Image sequence section, there is explained how to either renumber an image sequence starting by 1 or using the ‘glob’ method where the original sequence numbers can be kept).
So here is the process:
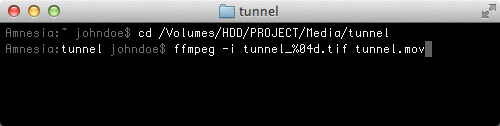
- Open the Terminal or Console and execute the following command:
cd /*path*/tunnel. Here we change directory (cd) to go in the folder called ‘tunnel’ where our images are located (/*path*/tunnel);* 1 - Now, being inside the folder, we can execute the following command in the terminal:
ffmpeg -i tunnel_%04d.tif tunnel.mov.2 Here, a video file (tunnel.mov) is being created inside the same folder using all the tiff files (.tif) starting by tunnel_ (-i tunnel_) with four placeholders (%04d).
* In case we are not sure of the exact written path (but we know ‘visually’ where the file is):
- on OSX, we grab the folder, from the Finder, with the cursor, and drop it inside the terminal window, the path of the file will then be printed on to the Terminal;
- on Windows, hold down the shift key, right click on the folder you want the path from and select Copy as path. Then, in the console, right click and select Paste.
The command
What matters the most in to transforming our image sequence to a video file is the following command: ffmpeg -i tunnel_%04d.tif tunnel.mov
-i tunnel_%04d.tif: that is where the magic happens; as an input (-i) we grab all (%) our tiff images (.tif) that have a common name (tunnel_) with the definition (d) of its numerical placeholders (04):
tunnel_: the common name. It can be anything else depending on how we have called the files of our sequence (when capturing them with the stop motion animation software), and the underscore is not necessary but makes the files easier to read;%(percentage sign): it is the sign used when we want to execute an operation that requires the manipulation of numerous files at once;0: it tells if zeros fill the gap of the short numbers. For example, the largest number of our sequence can be 1128 and the smallest can be then 0001 so all the numbers have four digits;34: tells how many placeholders (digits) are forming our sequential numbers. For example: tunnel_000002.tif has six digits (five 0 and one 2) so we will have to put%06d;4d: stands for decimal. We cannot use other system of numeral, like the Chinese’s, Amharic’s or the tally marks… It also precise that ffmpeg counts using integer, so no fractional digit is allowed in our sequential numbers (tunnel_¾.tif, tunnel_3,4.tif…).
Framerate
For this particular command, ffmpeg works by default in 25 frames per second. So if this is not the framerate we want to apply, we can change it:
ffmpeg -r 23.98 -i tunnel_%04d.tif tunnel.mov
Here we set our framerate (-r) to 23.98 frames per second.
Uncompressed version
We might want to to keep the original codec and quality of the original images into the outputted video file, so we are certain to work with an uncompressed video. It is useful when having to do some effects or rotoscoping on the outputted video, for example. The following command line will allow exactly that:
ffmpeg -i tunnel_%04d.tif -c:v copy tunnel.mov
The -c:v function allows us to precise the video codec of our video output. And by putting copy we are simply copying the codec from the original images; there is no re-encoding when creating the video file.
There is an interesting and more in depth forum post about the subject available here: http://jeremyrichard.com/documents/lossless-and-uncompressed-using-ffmpeg/.
Proxy version
For editing purposes we can make proxy videos out of our image sequence so our (old) computer won’t suffer to much of our 4K images… So for example, if working on Media Composer, we can execute the following command line:
ffmpeg -i tunnel_%04d.tif -c:v dnxhd -b:v 120MB tunnel.mov
Here we tell ffmpeg to encode our sequence using the DNxHD codec (-c:v dnxhd) at a bitrate of 120 megabytes (-b:v 120MB). That is if we want to use the DNxHD120 codec, having 185MB instead, for example, would mean that we want to use the DNxHD185 codec.
If we need to enter another codec such as ProRes or H264 after the -c:v function, we can execute the following command to list the codecs available with ffmpeg: ffmpeg -codecs. The ‘s’ at the end of codecs is not to be forgotten.
Image sequence
Starting number
One downside of how the program handles this, is that it needs the sequence to start by 0 or 1, but if it is not the case we can still renumber the sequence by doing a batch.
As it is not part of ffmpeg functionalities, the explanation of how to create a batch to renumber a file sequence has its own post, which can be find to the following link: http://jeremyrichard.com/tip/batch-renumber-files-with-zero-padded-sequential-number/. There are explanations for both OSX and Windows users with no need of third parties software.
Broken numbers
If the numbers of our image sequence appears to be broken, ffmpeg will simply stops the process where the break happens. So if our sequence appears like this: tunnel_001.tif, tunnel_002.tif, tunnel_003.tif, tunnel_009.tif, tunnel_010.tif, etc, ffmpeg will stop to add the images together once he reaches the tunnel_003.tif file, as the next image in the series is tunnel_009.tif and not tunnel_004.tif. The video file would then be composed of only the images between tunnel_001.tif and tunnel_003.tif.
If we do want all the images to be put together, despite the break, there is a command to achieve this (by cheating a bit):
ffmpeg -pattern_type glob -i '*.tif' tunnel.mov.
As I understand it, -pattern_type is there to tell ffmpeg that we are looking for something that comes back (a common pattern) in the files which should be in the files’ names, hence the glob parameter. We also precise that we do the search in all the files (*) with a tiff extension (.tif).5 Finally we enter the name and extension we want for the video (tunnel.mov). We can also add a specific framerate (-r), bitrate (-b:v), codec (-c:v) and so on.
The End