Prior to the 1st of June 2016, I explained that in order to use ffmpeg on OSX we needed to put the ffmpeg binary file inside the /usr/bin folder. With the release of OSX “El Capitan” 10.11, Apple did some changes regarding this particular folder (https://support.apple.com/en-us/HT204899). Basically any third party program cannot execute anything anymore from this folder but it can from the /usr/local/bin folder. So to be able to keep using ffmpeg (if we did the update to OSX 10.11) we simply need to move the ffmpeg binary file from the /usr/bin folder to the /usr/local/bin folder.
I updated this post accordingly.
What is needed
- administrator privileges (as we need the password used when installing applications);
- ffmpeg binaries (more of this later);
- a tool to uncompressed .7z type of file such as the gratis 7-Zip software (https://www.7-zip.org/)
- no fear of using the Terminal (located in Applications > Utilities).
For the ones in a hurry
For the ones who just want to get on with it and are at ease with the Terminal, here are all the steps require to install ffmpeg on OS X (for the ones who want a tad more explanations, read further):
- Download the latest ffmpeg binaries from the evermeet.cx website and un-zip the file to then extract the only and one file called ffmpeg;
- open the Terminal and execute
sudo cp /*path*/ffmpeg /usr/local/bin(replace*path*with the path of where you have un-zipped the file); - while still in the Terminal, check if it is properly installed by typing
ffmpeg -version, then should appear several lines with ffmpeg’s version number indicated on the first line.
Download ffmpeg
The ffmpeg program is contained in what we call a Unix Executable File; a file with no extension, simply called ffmpeg. Get a copy of the latest static ffmpeg binaries1 from the download section of ffmpeg.org. We will find it under the OS X section of the Download page:
- follow the Static builds for OS X Intel 64-bit link, it leads to a page with a series of ffmpeg-X.X.X.7z files. By checking the date of last modification of each file, download the latest one;
- un-zip the downloaded file using the Unarchiver software;
- we end up with a unique file called ffmpeg which has no extension.

The entire ffmpeg program is in one file

Implement ffmpeg
As opposed to native OS X applications (which usually have the .app extension), this ffmpeg file will not work from the Applications folder but from the folder called bin (binary) located inside the folder usr (user) located at the root (/) of the operating system’s partition. The only thing about that usr folder is that it is a hidden folder. Indeed, it is a folder used by the operating system in its everyday routine; making it easy to access that type of folder could increase the possibilities of, more or less, messing up the operating system. So to put the file at the right place and not messing up the operating system we can either use the Terminal (found in Applications > Utilities) or the Finder (for the ones with ‘commandlinephobia’).
Using the Terminal
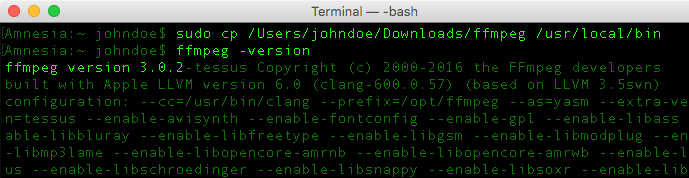
The Terminal sees everything, even hidden folders. So it is quite straight forward to tell the Terminal to grab the binary file we have downloaded and put it in the bin folder. Something like the following command would do the trick: sudo cp /*path*/ffmpeg /usr/local/bin It tells that: as a user with administration power (sudo: substitute user do) we are going to copy (cp) the ffmpeg file (/*path*/ffmpeg) in (the space between ffmpeg and /usr) the bin folder (/usr/local/bin). As an example, let say we have downloaded the file in the by default Downloads folder of OS X. The command would then be the following: sudo cp /Users/johndoe/Downloads/ffmpeg /usr/local/bin ( having your own username instead of johndoe).
Few remarks regarding this command:
- The path for the ffmpeg file (
/*path*/ffmpeg) might differ according to where we downloaded it. In case we are not sure of the exact written path (but we know ‘visually’ where the file is) we can grab, from the Finder, with the cursor, the downloaded ffmpeg file and drop it inside the terminal window, the path of the file will then be printed on to the Terminal.
When dragging a file from the Finder to drop it in the Terminal, the file’s path will be printed onto the Terminal - Using
sudomeans that the admin password is needed. Pressing Enter will execute the aforementioned command and then the password will be asked. We then type the password (we won’t see any hints in the Terminal – I suppose for privacy/security reasons) and press Enter to confirm.

If we want to be sure that the file has been copied, we can execute the following:
cd /usr/local/binls
It tells that we want to move (cd: change directory) to the bin folder (/usr/local/bin). Then we want to list (ls: list directory) what is inside this folder. From there we should see ffmpeg in the list being printed.
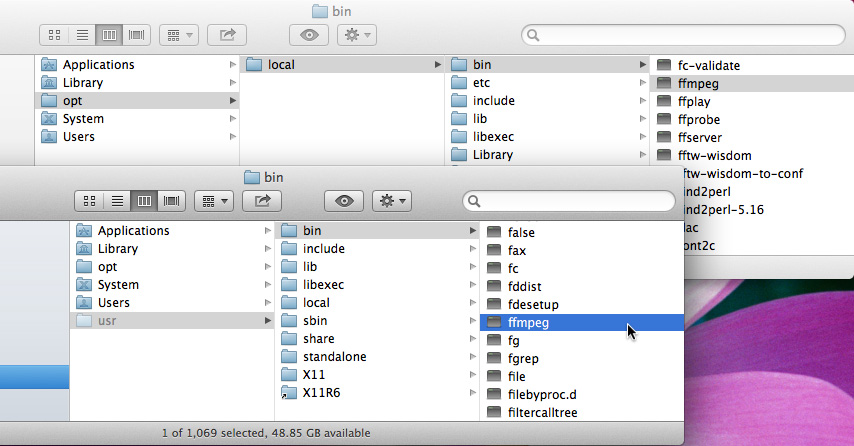
Using the Finder
By default, the Finder (the folder navigator of OS X) will not see hidden folders (the title of those type of folders is, I suppose, based on the interaction with the graphical version of the OS, as the Terminal does see hidden folder by default). But never mind that because the Finder can access hidden folders if we know the exact path of these folders:
- open a new Finder window and go to Go (in OS X upper/main application bar) then select Go To Folder ( Shift + Cmd + G);
- slides down from the Finder’s main menu a Go to the folder window with an empty field;
- in this field we are going to type the full path of the folder in which we want to put our file. The path of our folder is: /usr/local/bin. Once entered press Go;

The Go to Folder feature allows us to enter inside hidden folders - being now inside this bin folder, we copy the newly downloaded ffmpeg file and paste it inside this folder using drag & drop or cmd+c & cmd+v;
- it will then ask for the admin password which has to be confirmed.

Whatever interface used, the ffmpeg program is now well in place, let us check if it is actually working.
Execute ffmpeg
It is time now to see if the installation has been well executed. To do so we will check which version of ffmpeg is installed using the Terminal. In the Terminal, type the following command and press Enter: ffmpeg -version Will appear several lines with the first one mentioning the version that should correspond to the one of the file downloaded.

Beneath this line there is a list of all the libraries available, where all the commands for lots of different operations and codecs are listed. For example: --enable-libx264, means that the decoder and encoder contained in the library (lib) to manipulate video files using mp4 codec (x264) is available (--enable).
How does it work?
We have to think of the bin folder as the Applications folder for command line tools. Each file inside this bin folder is a different tool and the operating system is setup to look first inside this folder when typing the name of a command line tool in the Terminal. So, for example, when typing ffmpeg in the Terminal, the first thing OS X will do is to look inside the bin folder to check if the ffmpeg program is in there and execute it once it found it.
Update ffmpeg
The libraries are regularly updated and because there is no automatic updating system, you need, in order to have the latest ffmpeg libraries, to replace the old ffmpeg file by a new ffmpeg file copying and pasting the newly downloaded ffmpeg file in the bin folder. This manipulation is exactly the same as described in the first two parts of the tutorial: Download ffmpeg and Implement ffmpeg. The only difference is when copying the file in the bin folder the system will tell us that an older version already exists and it will ask if we want to replace it, which is what we want to do.2

It doesn’t work
Permissions
If some kind error message appears when checking ffmpeg’s version, it maybe means that ffmpeg has not the necessary permissions to be executed on the system. We thus need to give these permissions to the program using the Terminal or using a program called BatChmod which brings a graphical interface to it all.
Using the Terminal
- Open the Terminal and execute the following command:
sudo chown root:wheel /usr/local/bin. Basically it tells that as a user with administration power (sudo), we want the bin folder (/usr/local/bin) to belong (chown: change owner) to the user called root (the name of the super user of our computer who has all the rights, like installing software or changing administrative settings) in a group called wheel (a group of super users). - Then, still in the Terminal, execute the following command:
sudo chmod 755 /usr/local/bin/ffmpeg. As a user with administration power (sudo) you change the way we can handle a file (chmod 755) by make it possible to the user (ourselves if we are the administrator) to write, read and execute the file, symbolized by the number7; to the group (other people having an account on your computer) to be able to read and execute the file, symbolized by the first number5; and for everyone else to also be able to read and execute the file, symbolized by the second number5. It basically says that everyone can use the ffmpeg command line tool but not necessarily modify it.
Using BatChmod
BatChmod allows us to change the ownership of a file and what can be done with it, meaning: if we can read it, list the file (R); write it, save a different version of it (W) and/or execute the file (X).
- Download BatChmod from the lagentesoft.com website and install it;
- start the software and type the following path in the empty field next to the File… button:
/usr/local/bin/ffmpeg; - press the Tab key so we can have access to the other options:
- as an owner choose root and tick the R, W and X boxes;
- as a group choose wheel and tick the R and X boxes;
- as for everyone tick the R and X boxes as well;
- tick the Change ownership and privileges (if not already);

Using BatChmod we are changing the permission of the ffmpeg binary file - press the Apply button and again to confirm your settings;
- finally enter your administrator password when prompted to make the change of ownership.

MacPorts already installed
Note: this section regarding ffmpeg and MacPorts has been tested on OSX 10.8 (Mountain Lion) and not OSX 10.11 (El Capitan) like the rest of this post.
In the case of MacPorts being previously installed on our machine, when executing the command ffmpeg -version the version shown might not be the one of the ffmpeg file we manually installed. If this is the case, it could be that the Terminal is looking at what is inside /opt/local/bin prior to what is inside /usr/local/bin.
Indeed, MacPorts, when installing itself, creates its own binary environment so it reduces the chance of interfering with our system’s binary environment. Concretely, MacPorts creates a new folder – named opt in the system’s root – and then add in it a local folder in which is created all the necessary folders in order for the programs, installed via MacPorts, to work.
To be exact, the fact that the version shown in the Terminal is not the one it should be happens when we install another program, via MacPorts, that needs ffmpeg in order to work. If, for example, we install the program called kdenlive (editing software) using MacPorts, in the process MacPorts will install a version of ffmpeg, as kdenlive needs it. MacPorts will install ffmpeg in a shared place so other programs can grab ffmpeg if needed. This shared place is the /opt/local/bin folder. These programs inside these folders are called dependencies, as the programs are dependent on one another.
The Terminal looks at what is inside the MacPorts’ bin folder first (more on this later). The version of ffmpeg displayed in the Terminal, will then more likely be one below the one we have installed ourselves, as we have installed MacPorts before installing the downloaded ffmpeg program.
So, for whatever reason we need to keep both versions of ffmpeg (the one installed by us in the /usr/local/bin folder and the one installed by MacPorts) here is a solution to tell the Terminal to choose our ffmpeg over MacPorts’ ffmpeg, which is changing the path variable.
Attention: I do not know to what extend the solution of changing the path variable will disrupt the running of the other MacPorts’ programs. We are going to change the priority in the paths from MacPorts’ binary environment to the system’s binary environment, and it might cause trouble to other programs, installed via MacPort. So we might use this solution with caution and at our own risk.
How do we change the path variable (for the ones in a hurry)
For the persons who just want to get on with it and are at ease with the Terminal, here are the steps to change the path variable. More explanations follow if we want to understand a bit more about what we are doing here.
- start the Terminal;
- execute
vim ~/.profile; - press the
ikey; - type
/usr/local/bin:afterexport PATH="; - exit the editing mode of vim by pressing the esc key;
- executing
:x(colon + the letter x); - restart the Terminal;
- once back in the Terminal, execute
ffmpeg -version. We should now see the details from the version of the ffmpeg we installed manually and not the one installed by MacPorts.
Why and how do we change the path variable
We are basically going to add the path of our system’s binary folder (/usr/local/bin) in the file that gives the paths information to MacPorts.
MacPorts has a list of paths available for it to know where the dependencies are located. Amongst those dependencies there is ffmpeg; ffmpeg does work as a standalone program but it is also used by other programs, such as kdenlive, and instead of installing a copy of ffmpeg for each programs that need it, MacPorts will install it once and put it in a shared folder (/opt/local/bin) from which the other programs can have access to – it is more or less how all GNU Linux programs work.
But for MacPorts to know where this folder is, it has to create a profile file which mission is to describe the paths of the folders containing the dependencies. This file is simply called .profile. This is when we understand why the Terminal looks at the MacPorts’ bin folder before the system’s bin folder. Indeed, by default our system does not have a profile file and so our Terminal will simply look at the first bin folder it finds. But the system was programmed in a way that, if a profile file is created, the Terminal will look at the paths that are described in this profile file prior to the rest. And because this profile file was created by MacPorts, it will describe the paths of the bin folders from MacPorts’ installation. So the first path the Terminal will see will be the one inside the profile file, the one from MacPorts’ bin folder. This is why we are going to edit this profile file to tell our Terminal to look at the system’s bin folder in priority.
To edit the .profile file let us opening it. We will find the file in the root of our home directory using the Terminal:
- start the Terminal (in Applications > Utilities);
- execute the following command to open the file:
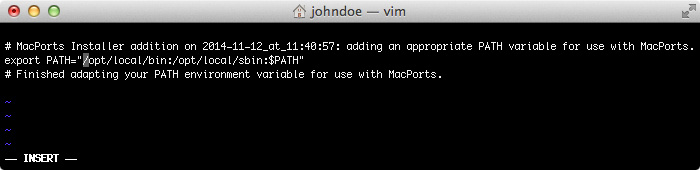
vim ~/.profile3 (vim is a tool that allows us to edit text files); - we are now in the vim editor and we can see few lines with one of these looking like this:
export PATH="/opt/local/bin:/opt/local/sbin:$PATH". It is on this line that we are going to give priority to the system’s binary environment over MacPorts’ binary environment. In order to edit the file:- we first press the
ikey (this is specific to vim); - then we can move the cursor after
export PATH="and type/usr/local/bin:(the colon is important here as it serves as a path separator); - we now have a line like this:
export PATH="/usr/local/bin:/opt/local/bin:/opt/local/sbin:$PATH"giving the/usr/local/binpath priority over the/opt/local/binpath simply because it is placed first on the line. The Terminal, when looking for where the dependencies are located, will read the/usr/local/binpath first and see if it finds anything. If not it will simply check inside the following path on this line, which is/opt/local/bin; - as we have modified the priority in the paths, we can exit the editing mode of vim by pressing the esc key;
- and finally, we confirm our change by executing the
:x(colon + the letter x) command, withxwhich means save the change and quit vim (:xwill be displayed at the bottom of the Terminal window);
- we first press the
- for the Terminal to know a change has been made we need to restart the Terminal;
- once back in the Terminal, let us check if the change has been taken into account by executing the
ffmpeg -versioncommand. We should now see the details from the version of the ffmpeg we installed manually and not the one installed by MacPorts.
The End