What is needed
- ffmpeg binaries (more about it later);
- to be able to uncompressed .7z type of file (a gratis software such as PeaZip can do it, http://peazip.sourceforge.net);
- no fear of using the cmd.exe tool which runs from the run program called with the Win + R shortcut
For the ones in a hurry
For the ones who just want to get on with it, here are all the necessary steps to install ffmpeg on Windows (for the ones who wants more explanations, read further):
- Download the latest 32 or 64 bit static ffmpeg build on the zeranoe.com website and un-zip the file;
- rename the main uncompressed folder to ffmpeg;
- place this ffmpeg folder in C:, at the root of the partition of Windows;
- open the console by typing cmd.exe in the Run window (Win + R);
- execute
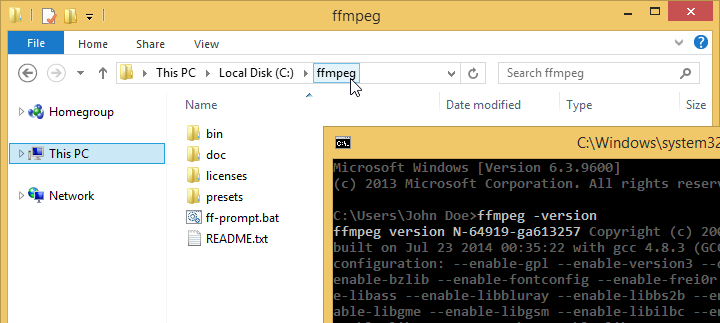
ffmpeg -versionin the console. A series of lines will appear with the reference of ffmpeg’s version on the first line.

Download ffmpeg
Get a copy of the latest build from the download section of ffmpeg.org. We will find it under the Windows Packages section of the Download page:
- follow the Windows Builds link, it leads to a page with a series of files all containing the ffmpeg tool but having being built differently. We are going to download the 32-bit Static build for stability or the 64-bit if we want to enjoy the full power of a 64 bit system;
- uncompressed the .7z file using PeaZip for example;
- we end up with a folder containing ffmpeg and its documentation, licence details, presets for encoding processes (useful when having to execute the same operation on numerous files) or even other applications such as ffprobe which can give details (like the bitrate, codec, etc.) of a video or audio file.
Implement ffmpeg
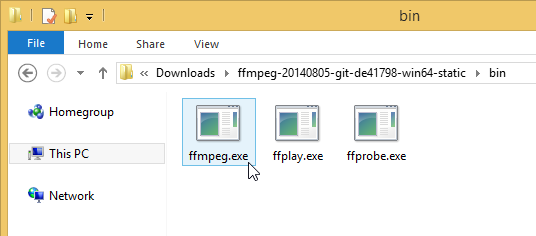
The newly un-compressed folder won’t contain any install.exe file that we could double click to launch the installer. It is actually even more straight forward than that: by un-zipping the file the program is ready to go. What matters in the newly downloaded folder is the ffmpeg.exe file found inside the bin (binary) folder. It is a self-contained file with everything inside for the program to work.

By double-clicking on it we trigger a console window with the ffmpeg command showing details of the program itself, but that is it: the window will automatically closes itself. In order to use ffmpeg we need to start it from the console:
- open the run program (Win + R) and type cmd.exe, a console appears;
- grab the ffmpeg.exe file which is inside the downloaded and uncompressed folder and drop it inside the console. Is now printed, onto the console, the path of the ffmpeg.exe file;
- add a space after the printed path and type
-version. It should give something like that:"C:\Users\John Doe\Downloads\ffmpeg-20140805-git-de41798-win64-static\bin\ffmpeg.exe" -version(with the path to ffmpeg.exe being different depending on where we put the file) - when pressing enter you should see a series of lines appearing, with the first one giving the ffmpeg’s version.
This works fine but it does mean that we have to type the full path of the program for every operation we want to execute. So instead of having to write something like: "C:\Users\John Doe\Downloads\ffmpeg-20140805-git-de41798-win64-static\bin\ffmpeg.exe" -version we want something like this: ffmpeg -version. There are at least two ways of doing this:
- either putting the main folder (re-named ffmpeg) in the system’s partition
- or creating a shortcut in case we don’t want ffmpeg to be lying in the C: partition.
ffmpeg folder in the system’s partition
We ‘call’ a program using the console so we can use it. The only thing though, is that the program needs to be at the right place for it to ‘hear’ its name being called. Such a place exists in the root of the operating system, which by default is C::
- let us take the uncompressed folder we just downloaded and paste it inside the C: partition, at its root;
- open the console (cmd.exe in the run program) and type
ffmpeg -version; - we then read a message like the following:
'ffmpeg' is not recognized as an internal or external command, operable program or batch file. It means it doesn’t work; simply putting the folder in the right place is not enough. Indeed, we need to give a name to this folder which would help Windows to call the program and be able to use it;
When at the root of the C: drive it is important to have the ffmpeg folder named ffmpeg - rename this folder ffmpeg;
- go back to the console and type
ffmpeg -version: now the console show a series of lines detailing ffmpeg’s functionalities.
Basically if we put the ffmpeg folder at the root of the C: drive (the system’s working drive) and naming this folder ffmpeg, it helps Windows to know where to look when calling the program from the Console.
Shortcut for ffmpeg
In case we don’t want the ffmpeg folder to be in the system’s partition while avoiding having to call it by entering is full path each time, we can create a shortcut:
- when going to Settings (accessible from the Charm Bar Menu, the one sliding from the right of the screen), choose PC Info and then select Advanced System Settings
- select the Advanced tab in the window that pops up;
- press the Environment Variable button located at the bottom of this window;

Creating a shortcut for ffmpeg let us the freedom to put the program wherever we want - Create a new variable by pressing on one of the two New… buttons (the New… button at the top is if we want to create a variable just for the current user, the second New… button is if we want the variable to be for every user):
- in the variable name field type path;
- in the variable value field type the path that leads to the bin folder of the newly donwloaded folder: D:\*path*\bin (beware of the backslash sign (\); it is not a forward slash sign (/);1
- create the shortcut by pressing OK.
- confirm the action and quit the Advanced System Settings windows by pressing OK of the remaining windows;
The last thing to do now is to check if ffmpeg is well installed.
Execute ffmpeg
Like seen before, one way to verify if ffmpeg is well installed is to check its version:
- open the console using the cmd.exe command in the Run programme (Win + R);
- type the following command in the console:
ffmpeg -version; - press Enter to execute the command;
- appears beneath a series of lines with on the first one the version and copyright of ffmpeg, followed by a list of all available libraries with lots of
--enable-somethingand otherlibsomething.

For example, if it says --enable-libx264: it means that the decoder and encoder contained in the library (lib) to manipulate video files using mp4 codec (x264, a free alternative to h264) is available (--enable).
Update ffmpeg
There is no automatic updating option; the updating process has to be done manually. It requires to download the latest of the ffmpeg static builds and replace the already existing ffmpeg folder by the newly downloaded one. A simple copy and paste will do. Then we can go to the console and type ffmpeg -version to check it has been well updated by seeing, for example, the built on line having a more recent date.
The End

