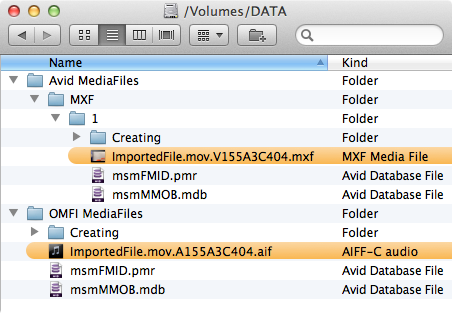
When the MXF container was ready to be used, specially for high definition footage, Avid implemented it in their software such as Media Composer; the default format for Media Composer went from OMF (Open Media Framework) to MXF (Material eXchange Format). It was not simply a change in the file format but also a change in the media folder structure: it went from OMFI MediaFiles folder to Avid MediaFiles folder.
OMF or MXF
Video
To check whether the video files would be in the OMFI (Open Media Framework Interchange) or Avid MediaFiles folder:
Note: What follows concerns only Standard Definition projects. Indeed, MXF container is the only available format for High definition projects;1 imports of video files in a HD project can only be done in an Avid MediaFiles folder as MXF files.
- from the project window, where the bins are, go to Settings then select Media Creation;
- in the new dialogue box that pops up select Media Type;
- now next to Video File Format we can use either OMF or MXF:
- choosing OMF, our files will end up in an OMFI MediaFiles folder and being wrapped in an OMF container;
- choosing MXF, our files will end up in an Avid MediaFiles folder and being wrapped in a MXF container.

To check which format our footage would be wrapped in, is knowing where our footage will be stored on our drives.
Audio
To check whether the audio files would be in an OMFI MediaFiles folder or Avid MediaFiles folder:
Note: As opposed to the video files, the audio files, whether it is a SD or HD project, can be put in either OMFI or MXF media folders.
- from the project window, where the bins are, go to Settings then select Audio Project;
- in the new window that pops up and then under the Main tab, we can select which format we want for our audio:
- choosing WAVE or AIFF-C will import our files into an OMFI MediaFiles folder, and our files will then have either the wav or aif extension;
- choosing PCM will import our files into an Avid MediaFiles folder and have these being wrapped in the MXF format.

The choice between audio formats are the same whether we work on a SD or HD project. But only the PCM format will wrap the audio files as MXF.
Separated media files of clips to put in the same media folder
It could be that, for whatever reason, when imported or captured, the video and the audio files of our clips are not in the same media folder (the audio files in the OMFI MediaFiles folder and the video files in the Avid MediaFiles for example). And if for organizational reason we want those to be in the same media folder while keeping their original references to the master clips here are at least two solutions:
- if we still have the original files or tape, we can reimport the files or recapture the tapes;
- if we do not have the original files or tapes anymore, we can transcode the wrongly placed media files to the format that will put those in the same folder as the other rightly placed media files.
We could also try moving the audio or the video from one media folder to the other simply by copying and pasting the files in question via the Finder/Explorer. This will not work as Media Composer will not recognize the newly copied files and will let us know it by asking us what can be done with these files with a dialogue box popping up saying that the software can not scan the files (the newly copied files) and ask us if we should put the files in quarantine or ignore these.

Note: what follows concern only clips which video and audio are in different media folders. If you want to move media of clips that are together but not in the media folder you want, follow the link to the Rename The Media Folder post.
Reimport
It has to be said, depending on the amount of footage previously captured or imported, this could be either a long or a very long process. For our own sanity it is recommended to try the following procedure on one clip before trying to batch the whole bin…
Let us say that we want the audio of our clips, which is in the OMFI MediaFiles, to be in the Avid MediaFiles folder where the video of our clips is.

Batch Import
- Make sure that PCM is selected in the Audio Project settings under the Main tab;
- inside the bins, select the clips we want to reimport;
- right click on these and select Batch Import…;
- in the new window that pops up, select All clips and not Offline Only as, indeed, the video and audio of the clips are not offline but simply in difference places;

The offline option is not relevant when batch import footage in order to have the associated media back all in the same media folder. - then at the top of the Batch Import window, select all the concerned files;
- choose the video resolution and disk target;
- finally, hit Import.
During the process, Media Composer will delete the previously imported files but will automatically relink the newly imported media files to the original master clips.2
One disadvantage with this method is that both the video and audio will be reimported; we can not select just the audio or just the video of a clip, even when one of the media file of a clip is actually offline.
Batch Capture
Note: batch capture implies that we still have the original tapes.
If tapes has been used as a source of footage we will be using the Batch Capture tool. For the purpose of this exercise we will say that the video of our clip is inside the Avid MediaFiles folder as MXF files and the audio of our clips is inside the OMFI MediaFiles folder as wav of aif files and we want these as MXF files inside the Avid MediaFiles folder where the video files are:
- make sure that PCM is selected in the Audio Project settings, under the Main tab;
- select the clips we want to recapture;
- right click on these and select Batch Capture…;
- in the Batch Capture window that pops up, uncheck the Offline media only option as indeed the video and audio of the clips are not offline but simply in difference places and click OK;

Our clips are not offline but simply have their media files not where we want those to be. We can then uncheck the Offline media only option to be able to re-import our online clips to another media folder. - the Capture Tool window will open and start straight away to capture with the video and audio tracks of the clips selected.
Like for the Batch Import tool, Media Composer will recreate the media files for both the video and audio. And it is important to note that because, before batch capturing, it deletes the originally captured media files, if the batch stops before it actually finishes to capture the new media files, the original captured files will be lost and the clips will be offline.
Unlike the Batch Import tool, we can decide not to recapture the media files that are in the right place (the video files in this example) and just recapture the media files that we want to move. To do so, first we need to put the media we want to recapture offline (the audio in this example):
- inside the bin, select the clips in question and press the delete key;
- a Delete window appears in which:
- we check the Delete the associated media file(s) option;
- check the Audio line in the Resolution to Delete part;
- click OK.

We can deliberately delete the misplaced media files so we can re-capture these into the right media folder, without recapturing the other associated media files which are already where we want those to be.
The audio media of our clips are now offline.
From now we can go through the Batch Capture procedure:
- make sure that PCM is selected in the Audio Project settings, under the Main tab;
- select the offline clips we want to recapture by clicking on the bin menu (hamburger menu) and choose the Select Offline Items option;3
- right click on these offline clips and select Batch Capture…;
- in the Batch Capture window that pops up, check the Offline media only option: this is what tells Media Composer not to capture the video again, as it is not offline;
- click OK to launch the Capture Tool which will capture straight away, with only the audio tracks selected.

If the audio is offline, when batch capturing, Media Composer will only re-capture the audio.
Moving the media files by consolidating these
If we do not have the original files or tapes anymore, we can use the consolidate tool.
Note: Unfortunately this method implies to re-encode the files, so we will be loosing quality.
Like for the previous examples, we want our audio media files together in the same media folder with the video files which are MXF files:
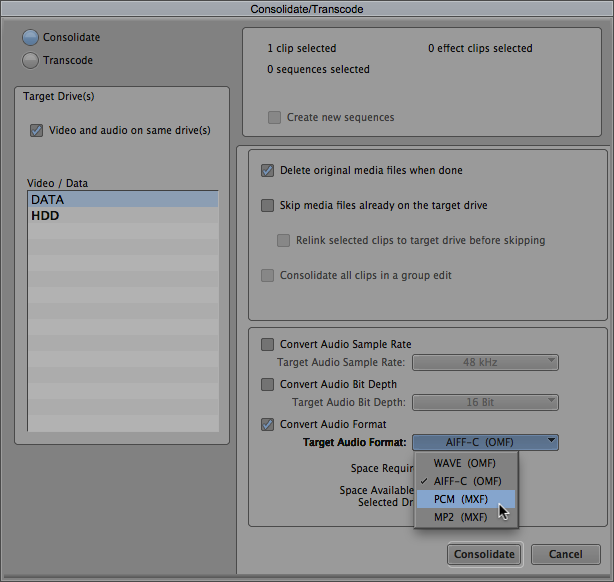
- select the corresponding clips in the bin and right click Consolidate/Transcode…;
- in the new Consolidate/Transcode window that pops up, check Consolidate;
- check the Delete original media files when done option;4
- unchecked Skip media files already on the target drive option, in case both the OMFI and Avid MediaFiles folders are in the same drive;
- check Convert Audio Format and select PCM (MXF);
- hit the Consolidate button.

When we do not have the original footage and we need to move the media files to another media folder, consolidating via converting the media can be a solution.
If we Reveal File on the consolidated clip we will see that the old media files are gone and new ones have been created; in other words the master clips still the same despite new media files associated to these, which means that even if the clips have been edited, prior to consolidate, these will not be offline in the timeline.
The End


